Data access levels determine which elements of the system are visible to each dynamic user group. Data access levels can be configured individually for each dynamic user group, giving them specific read or read and write rights. This gives you the ability to customize visibility and interaction with various system elements, such as reports, categories, announcements, or knowledge base entries, according to your organization's needs and security policies.
To configure a dynamic user group: Go >
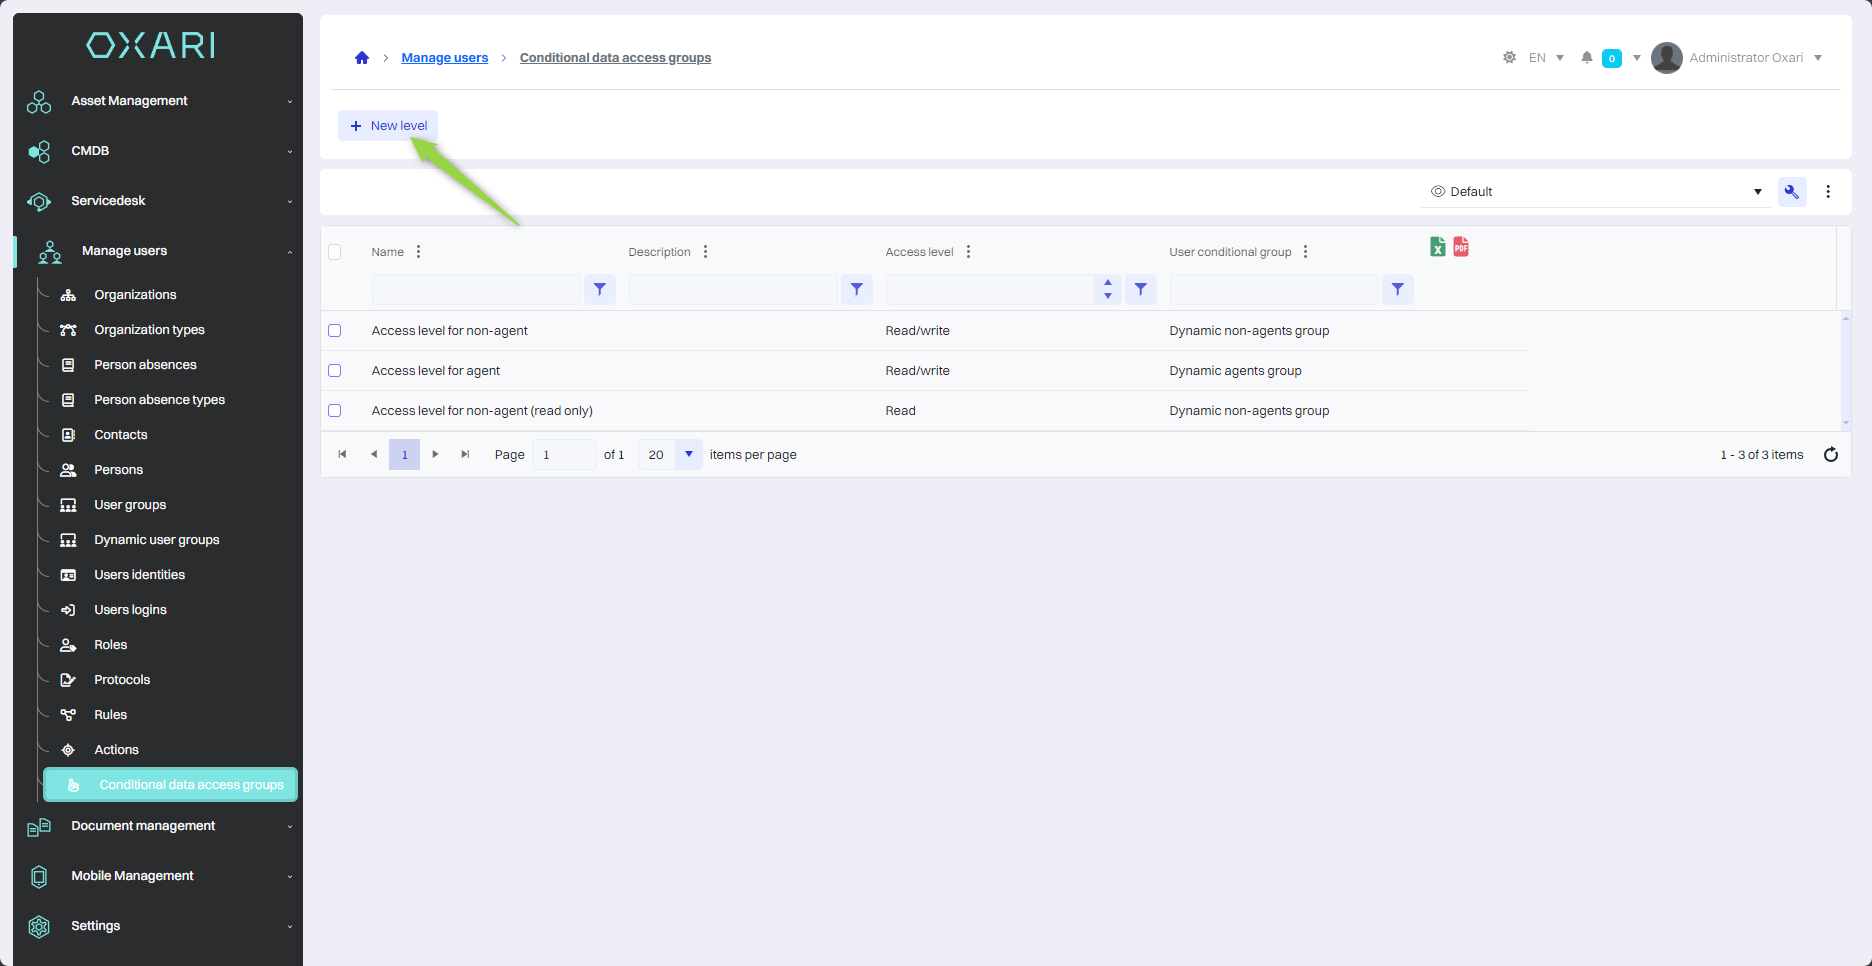
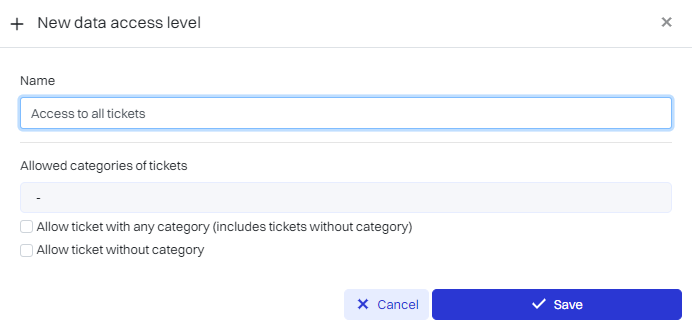
New data access level
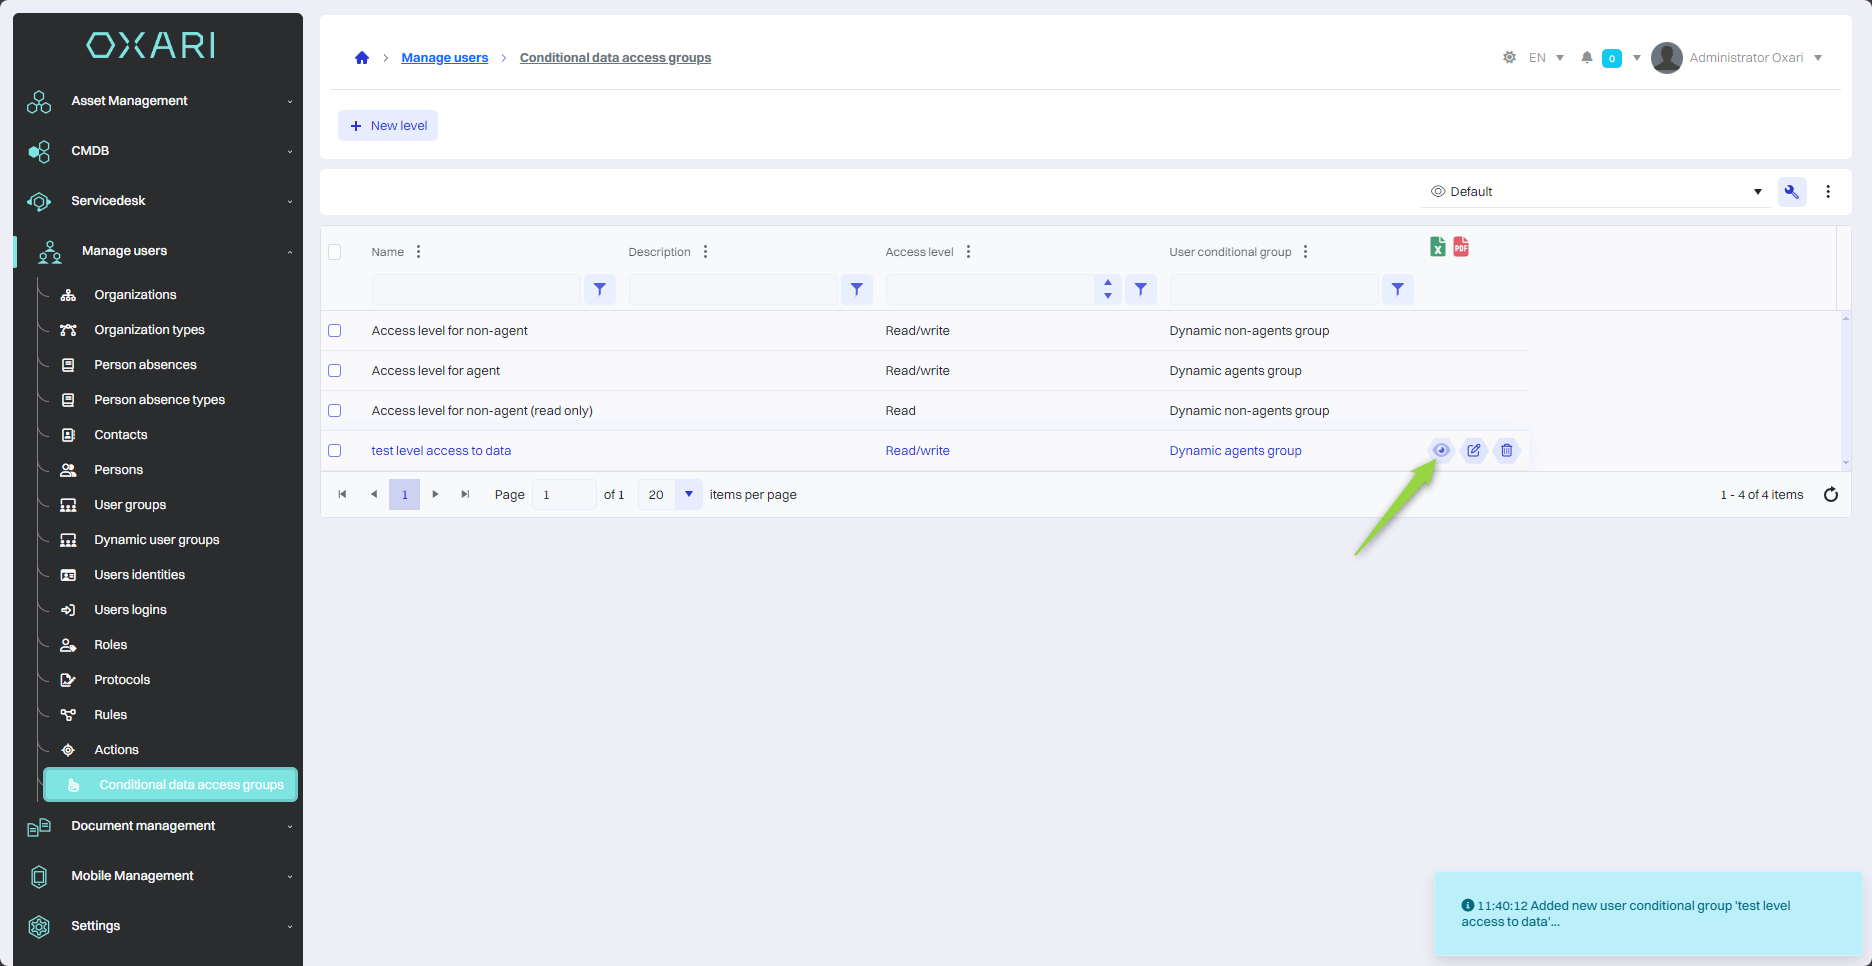
To add a new access level, go to User Management > Data Access Levels, and then click the "New Level" button.
Filling
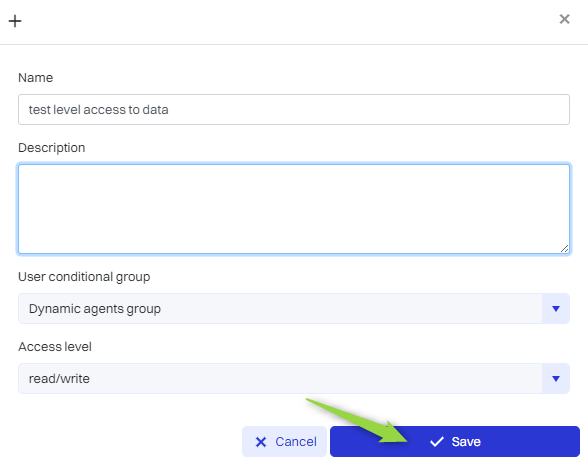
Next, the window contains the following items:
|
1 |
Name - A field where the name of the new access level is entered, identifying it in the system. |
|
2 |
Description - Here you can add a description that explains the function of the access level or the permissions that will be associated with it. |
|
3 |
Access group - A selection list from which you can choose a dynamic group of users to which you want to assign a data access level. To configure a dynamic user group: Go > |
|
4 |
Access level - This selects whether users in the selected group will have "read" data or "read/write" permissions. This determines whether they can only view the data or can also modify it. |
Fill in the fields and click the "Save" button.
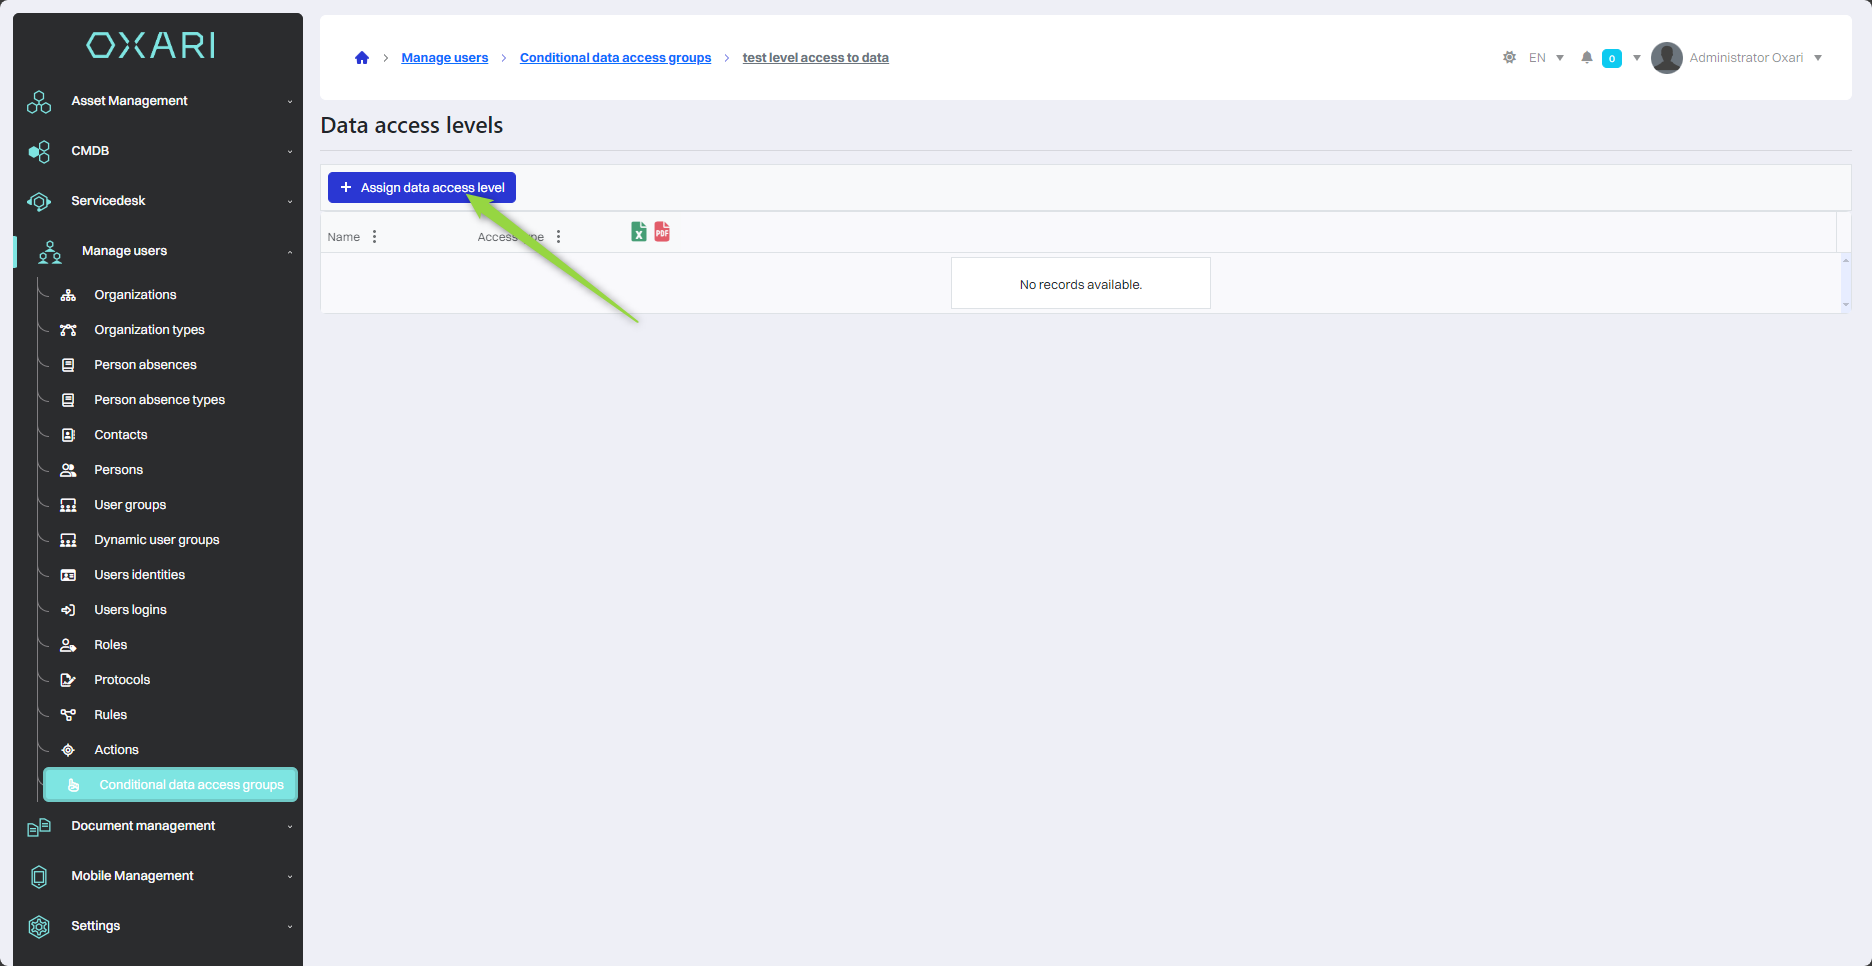
Assigning an access level
To assign an access level, go to User Management > Data Access Levels, and then enter the detail view of the desired data access level.
Then, in the detail view of the access level, click the "Assign access level" button.
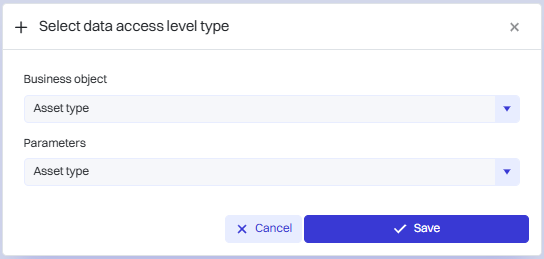
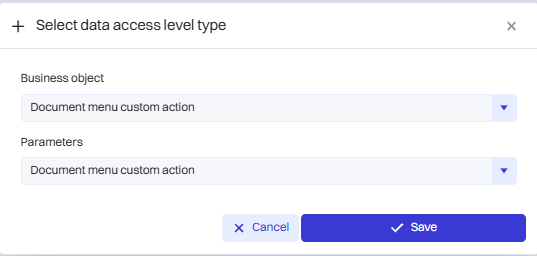
In this step, in the "Select the type of access level" window you will find:
|
1 |
Business object - This is a representation of a real business element in an information system, such as reports or organization type. |
|
2 |
Parameters - These are configurable attributes that define the properties and behavior of a business object. |
Select the desired options and click the "Save" button.

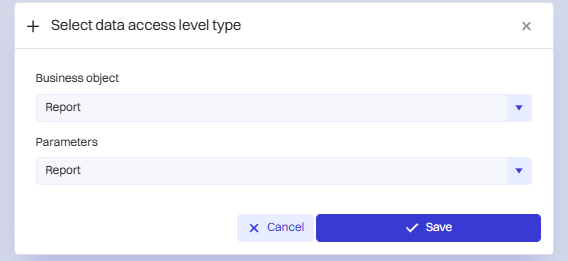
In this step, in the "New access level" window, name the access level and select the desired options, such as access to all reports. Finally, click the "Save" button.
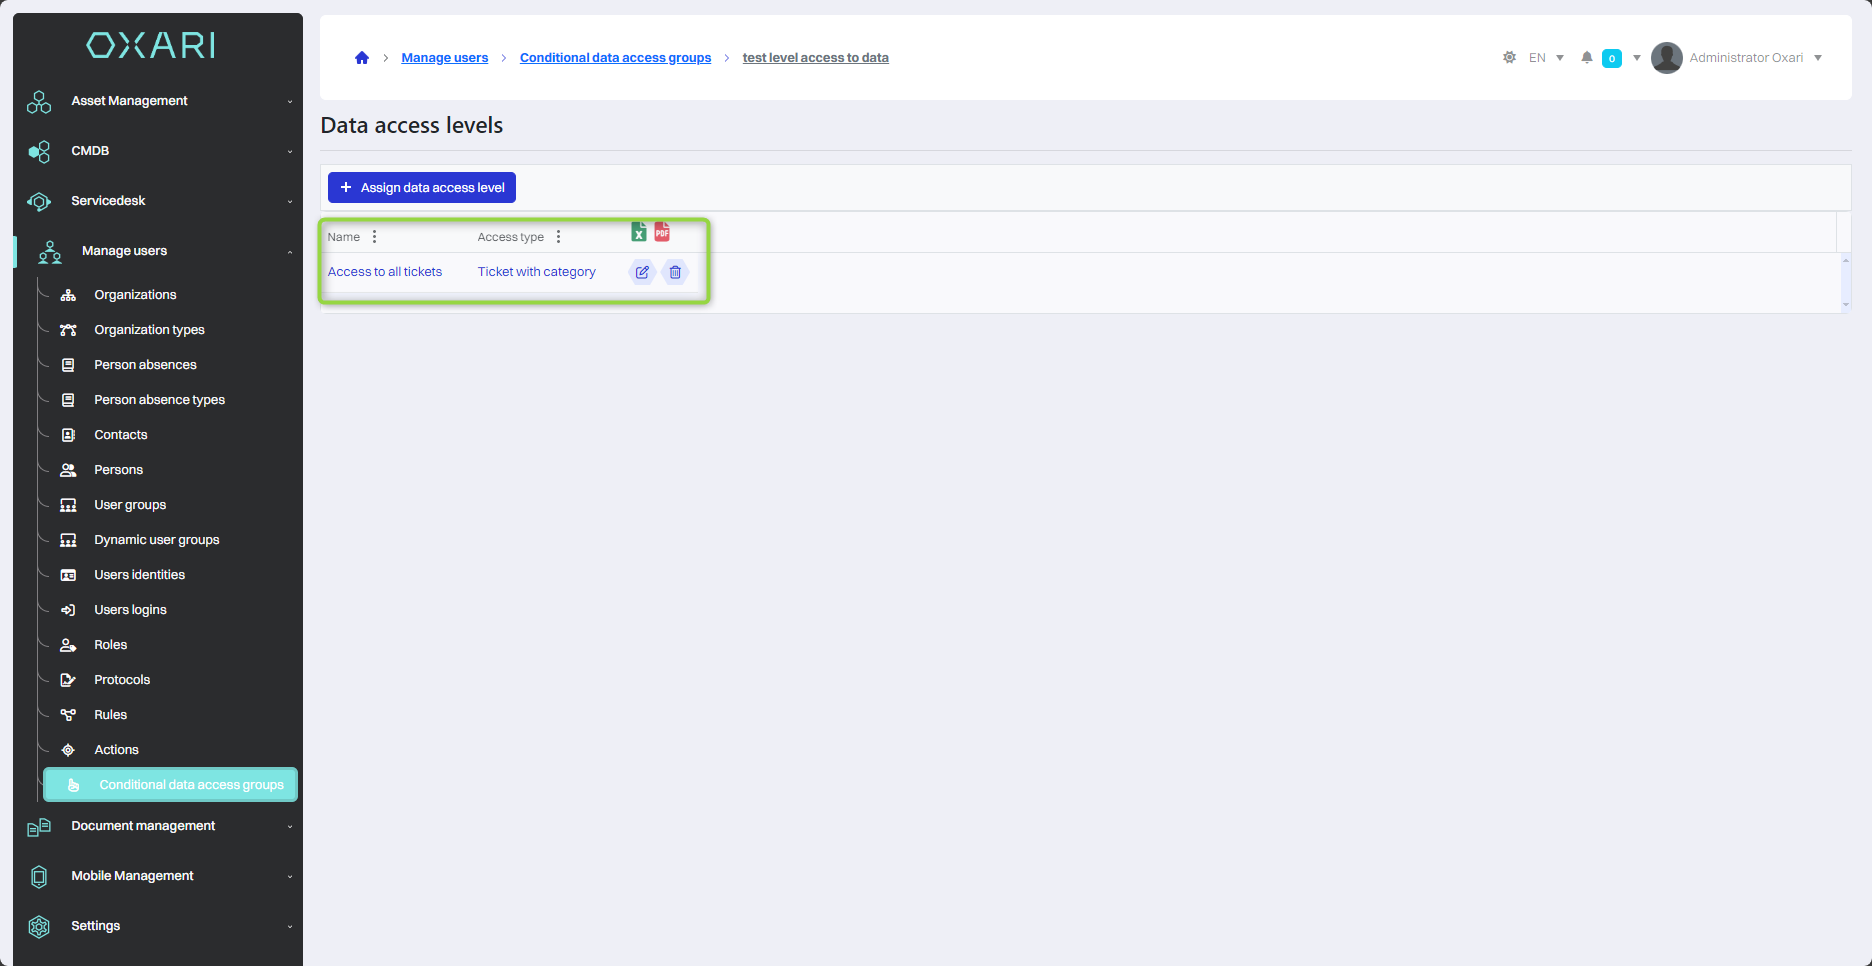
The access level has been assigned.
Example of access level operation
To learn how to assign access Go >
Each time access is granted/changed, the user must log in again.
If we want to restrict a given group of users from accessing a particular type of asset, we can use a data access level.
To do this, we assign a new access level.
We select the Business Object “Asset type” and Parameters from the “Asset type” list. Then we click “Save”.
Then we fill in the desired fields.
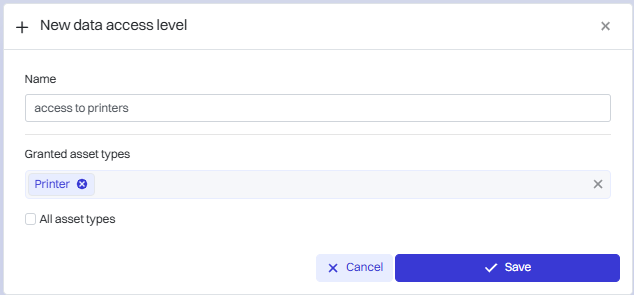
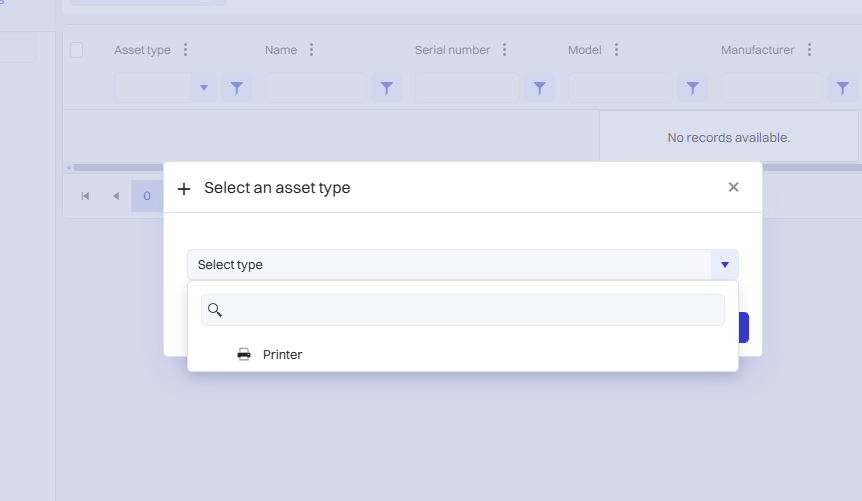
We select the type of asset that the user should have access to. In our case, it will be “Printer”.
After assigning this type of access level, the user is able to create a asset of the “Printer” type only.
It is important to correctly set access levels for given dynamic groups. It is recommended to check to which user group the person for whom you want to set access levels belongs.
Knowledge base
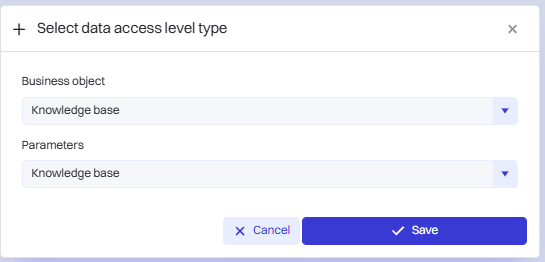
We select the “Knowledge Base” Business Object and Parameters from the “Knowledge Base” list. Then we click “Save”.
Then we fill in the fields. In our case, the user will have access to the CMDB knowledge base.
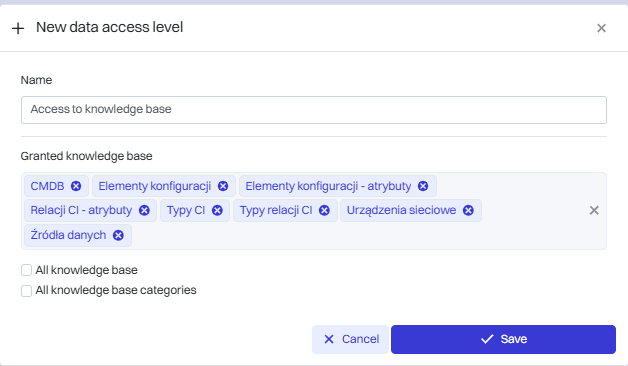
|
1 |
Name - The name of the data access level. |
|
2 |
Granted knowledge base - From the nested drop-down list, select the knowledge bases to which you want access to be granted. |
We have been granted access to the CMDB knowledge base.
Reports
Through this parameter we give the user permissions to the reports we have selected.
Select the Business Object “Reports” and Parameters from the “Reports” list. Then click “Save”.
We fill in the fields we desire.
|
1 |
Name - Data access level name. |
|
2 |
Granted reports - From the drop-down list, select the reports you want access to. |
Ticket
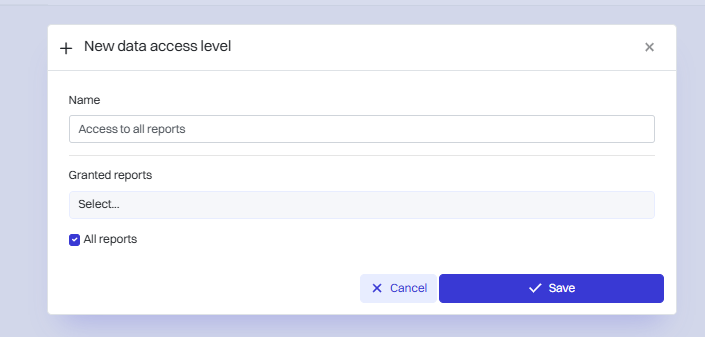
We select the “Ticket” business object and parameters “Ticket category“ from the list. Then we click “Save”.
Parameters:
|
1 |
Ticket category - Grants access to visibility of tickets for selected categories. |
|
2 |
Cost center - Gives access to tickets that have a selected cost center. |
|
3 |
Assignee group - Grants access to tickets that have the selected caregiver group. |
|
4 |
Ticket assignee - Grants access to tickets that have selected assigned users. |
|
5 |
Organizations - Grants access to tickets that have the same organization as the selected one. |
|
6 |
Subordinate - Grants access to tickets that have subordinates selected. |
|
7 |
User - Grants access to tickets that have selected assigned users. |
|
8 |
Reporter department - Grants access to tickets that have selected reporter departments |
|
9 |
Reporter location - Grants access to tickets that have selected reporter locations |
|
10 |
Reporter company - Grants access to tickets that have selected reporter companies. |
|
11 |
Reporter organizational structure - Grants access to tickets that have the reporter organizational unit selected. |
|
12 |
Reporter location structure - Grants access to tickets that have the declarant's location unit selected. |
Adding several parameters, results in narrowing the permissions.
By granting access to a selected cost center and a selected organization, a user with this level of access will have access only to such requests that meet the cost center and organization condition.
Example for Ticket category.
|
1 |
Name - Data access level name. |
|
2 |
Allowed categories of tickets - Allowed entries for the category |
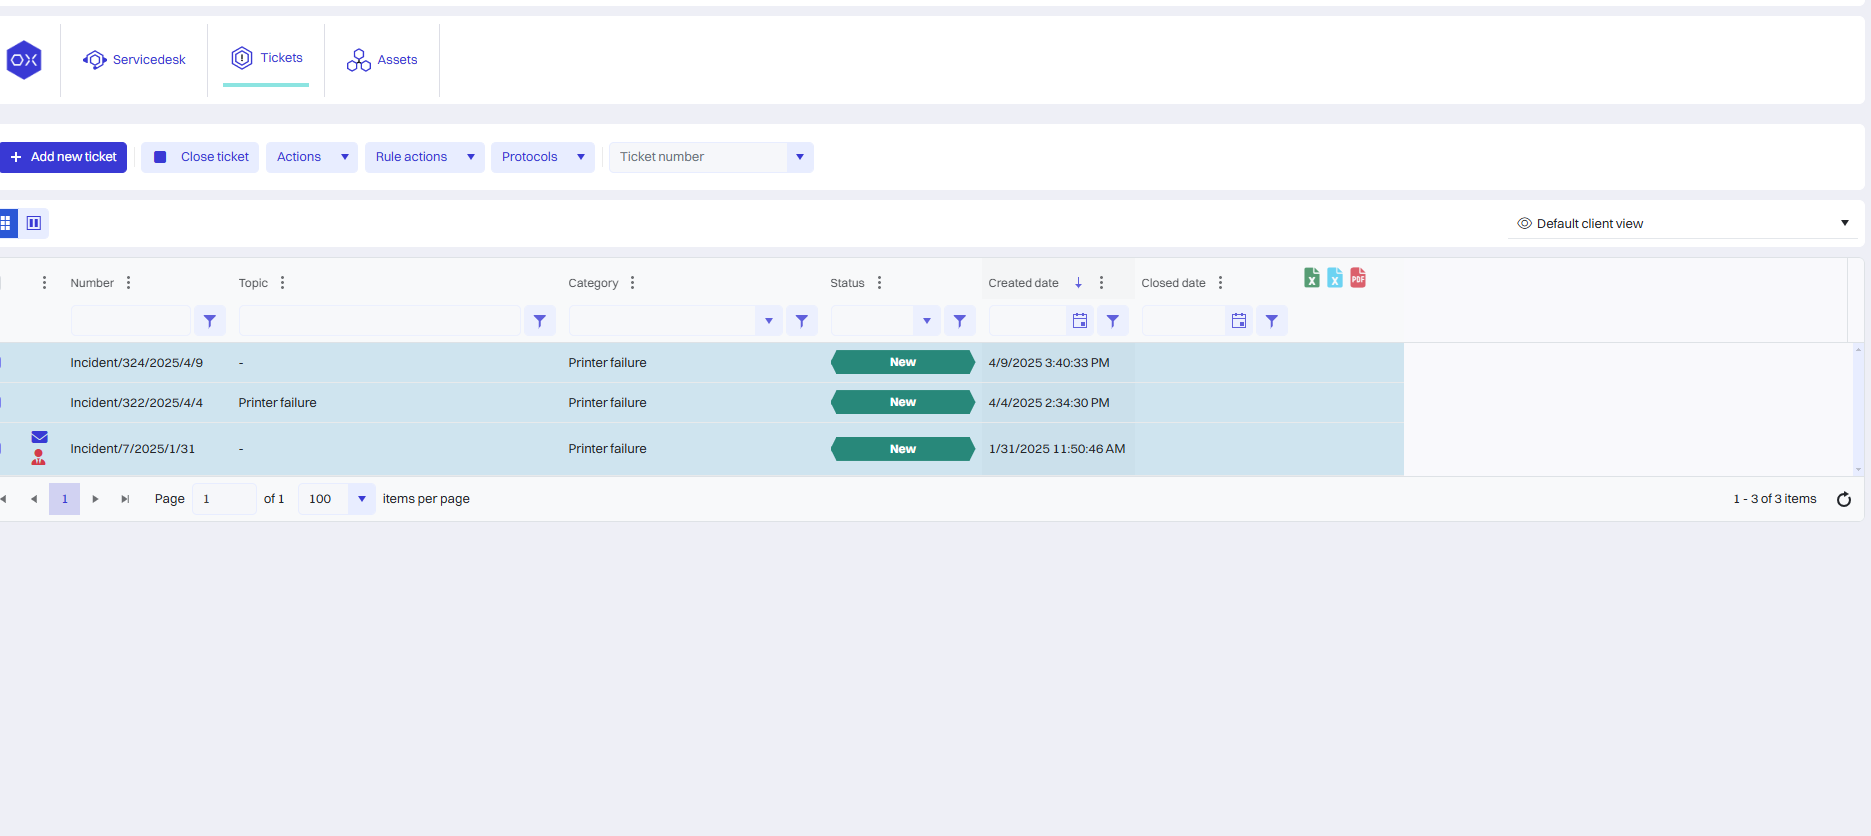
Add access to printer failure only
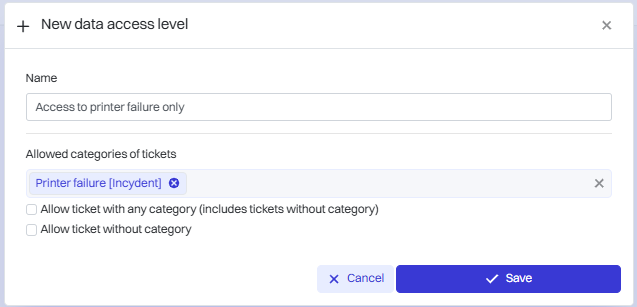
In the table, we see only those requests in the “Printer failure” category:
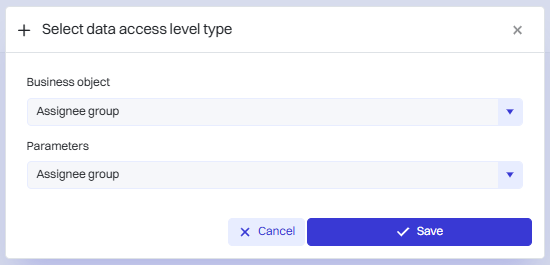
Assignee group
Select the Business Object “Assignee Group” and Parameters from the “Assignee Group” list. Then click “Save”.
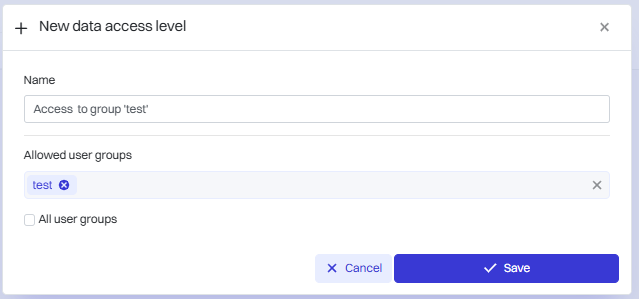
Then we fill in the fields by us.
|
1 |
Name - Name of data access level. |
|
2 |
Allowed user groups - Allowed groups to which selection will be granted access. |
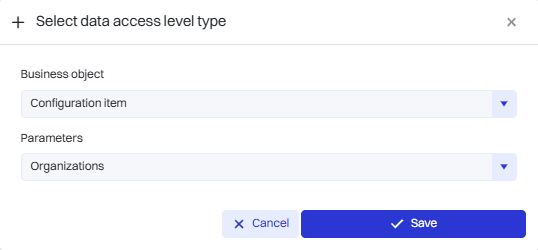
Configuration item
|
1 |
Type - Grant access for elements with the selected CI type. Those elements whose type is contained in the assigned access will be visible. |
|
2 |
Organizational Structure - Grant access for elements from selected organizational units. You will see those elements whose organizational structure is contained in the granted access. |
|
3 |
Organizations - Grant access for elements with the selected organization. You will see those elements whose organization is contained in the granted access. |
Type
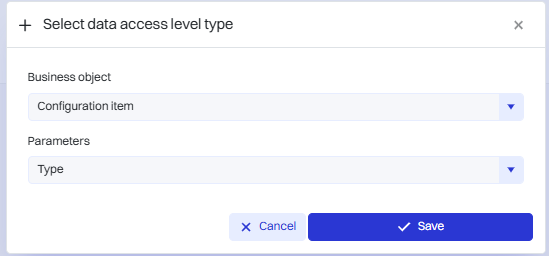
We select the Business Object “Configuration item” and Parameters from the “Type” list. Then we click “Save”.
We then fill in the fields we desire.
|
1 |
Name - The name of the access level. |
|
2 |
Allowed configuration item types - We select CI types to which items will be given access. |
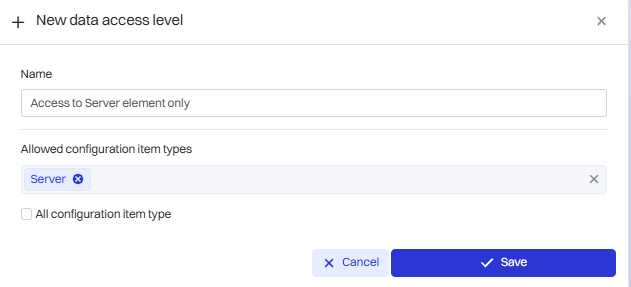
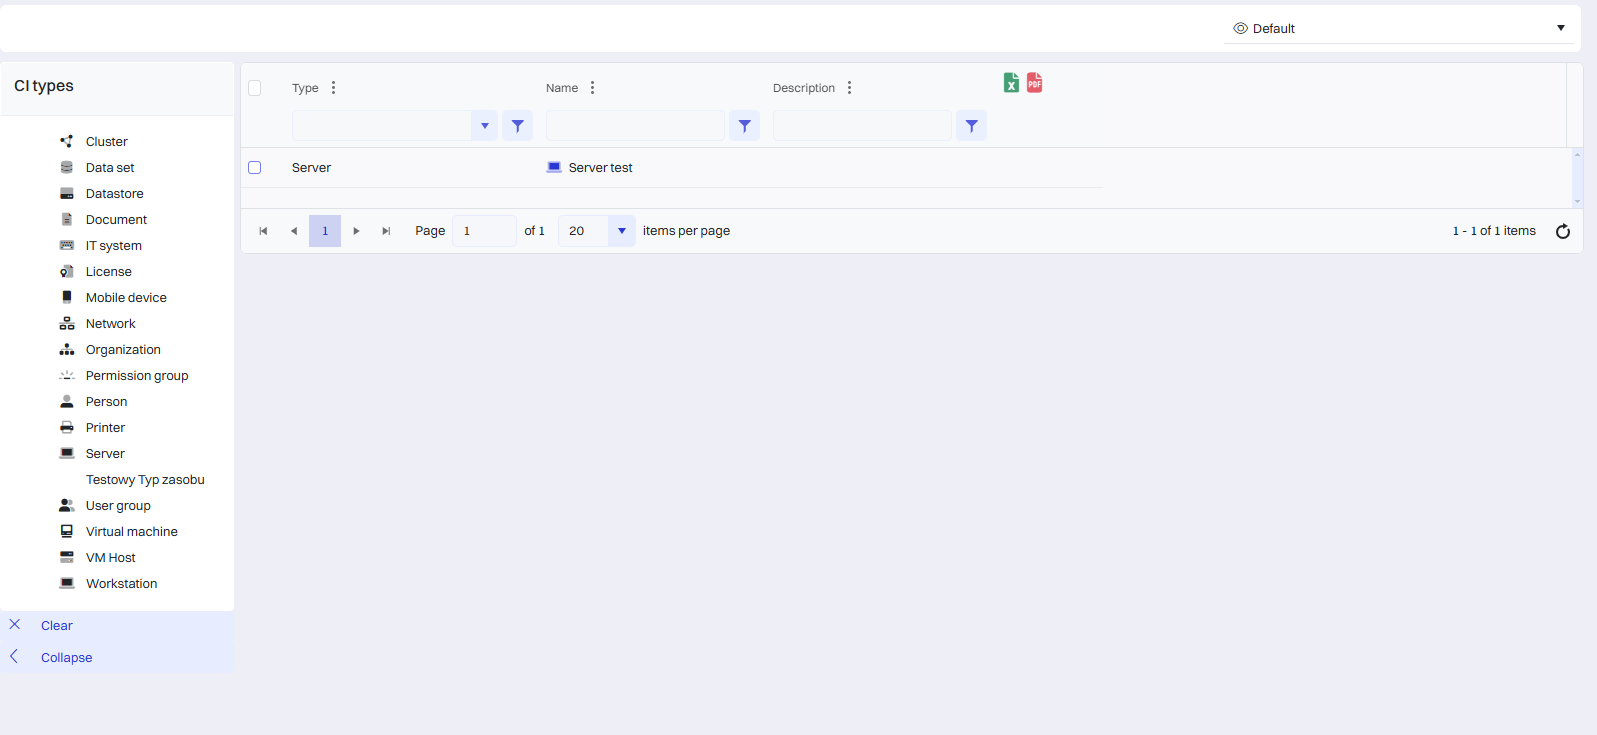
A person with this level of access can only see items of a given type (in our case, it's a server)
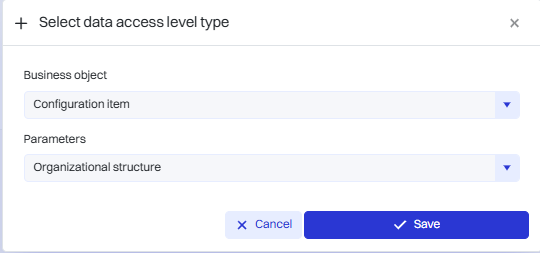
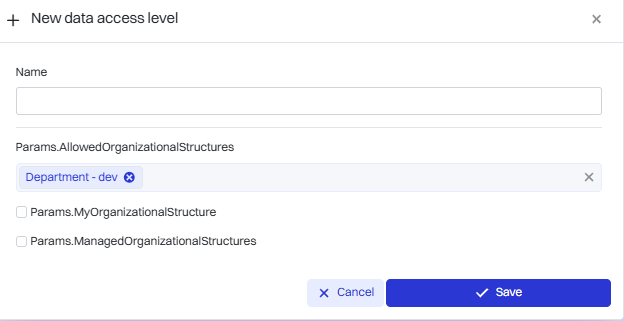
Organizational structure
Access will be granted to those elements that have an assigned organizational structure that is contained in the access level.
Select the Business Object “Configuration item” and Parameters from the “Organizational structure” list. Then click “Save”.
We then fill in the fields we desire.
|
1 |
Name - The name of the access level. |
|
2 |
Allowed Organizational Structures - These will be elements from selected organizational units |
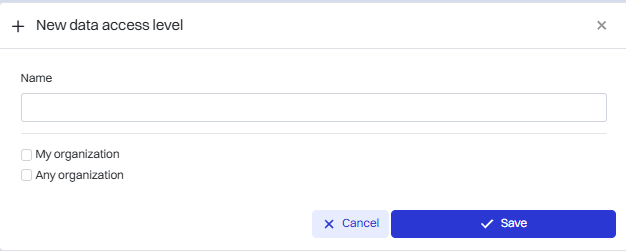
Organization
Access will be granted to those elements that have an assigned organization included in the access level.
We select the Business Object “Configuration item” and Parameters from the “Organization” list. Then we click “Save”.
We then fill in the fields we desire.
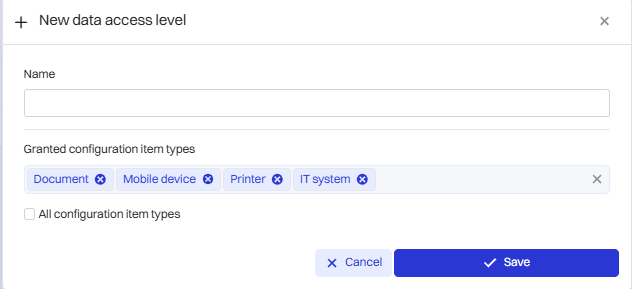
Configuration item type
This level grants access to display the selected configuration item types themselves.
We select the “Configuration item type” business object and Parameters from the “Configuration item type” list. Then we click “Save”.
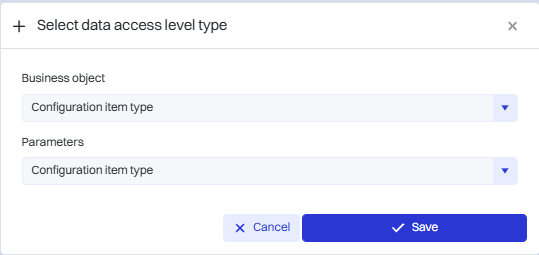
We fill in the fields we desire.
|
1 |
Name - The name of the access level. |
|
2 |
Granted configuration item types - Select the types of CI to which access is to be granted. |
Configuration item relation
We select the business object “Configuration item relation” and parameters from the list. Then we click “Save”.
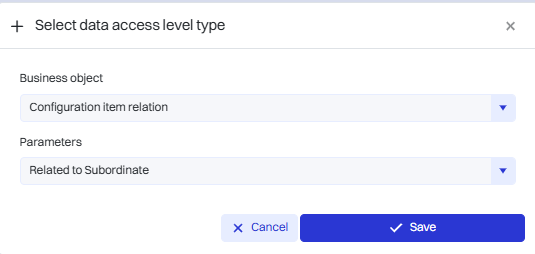
Parameters:
|
1 |
Related to Subordinate - Access to related subordinates |
|
2 |
Type - Granting access to selected types of relationships. |
|
3 |
User - Access to users |
|
4 |
Related to issue - Access to related notification |
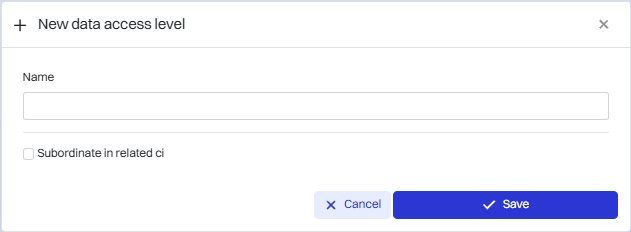
Related to a subordinate
The access level refers to those relationships that are related to a subordinate, i.e. Director X will have access to Employee X (subordinate) relationships.
We fill in the desired fields.
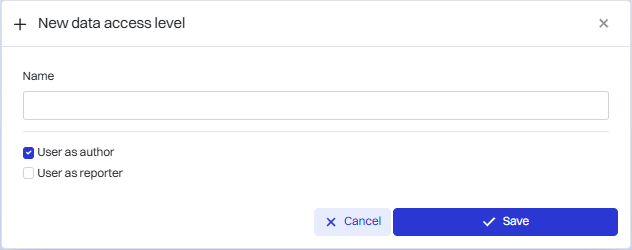
Related to the submission
The access level touts those submissions that are related to the user, e.g. as an author and/or submitter.
Type
|
1 |
Name - data access level name. |
|
2 |
Allowed configuration item relation types - relationship types of configuration items that will be allowed for this level of access. |
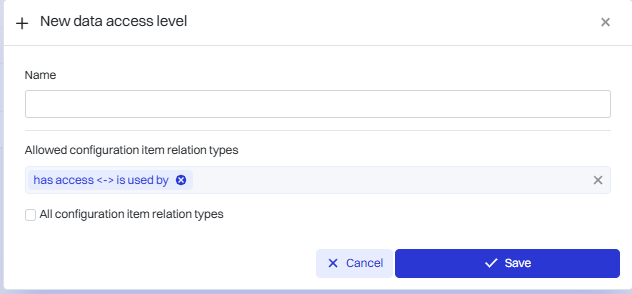
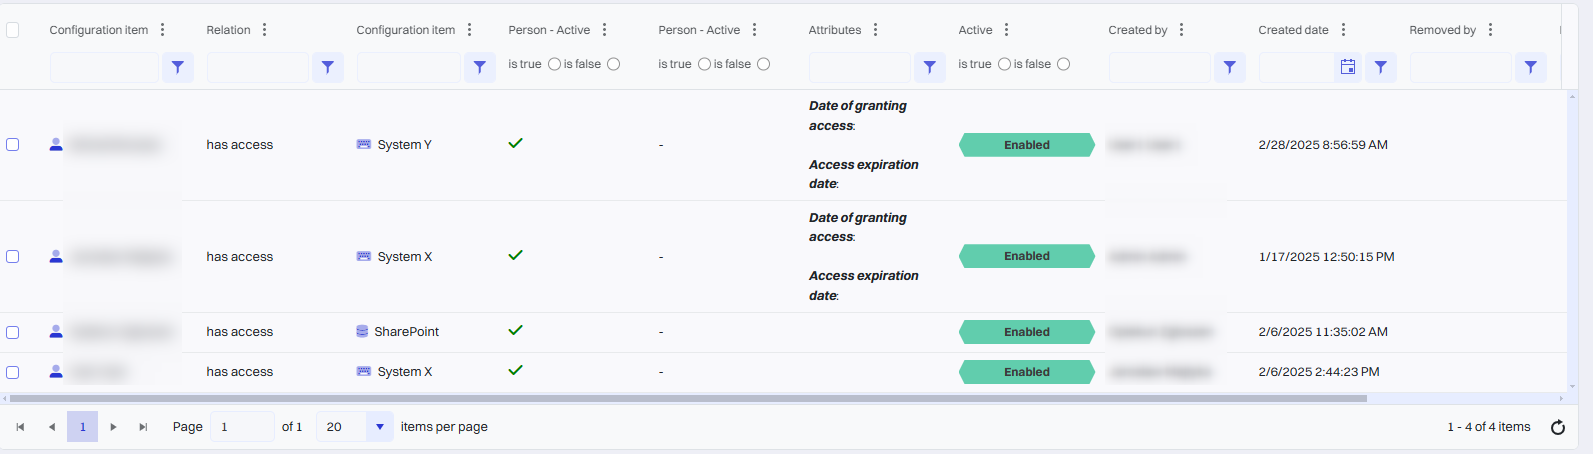
In our case, access to these relationships will be granted for the type “has access ↔︎ is used by”.
A person with this access level in CMDB > CI Relationships will see the following list for allowed types.
User
The User parameter is responsible for the relationship for the selected user.
|
1 |
Name - The name of the data access level. |
|
2 |
Relations associated with person from given organizational structures - Organizational structures to be linked. |
|
3 |
Relationships associated with configuration items associated with me by relationship type - Selected relationships to which access will be granted. |
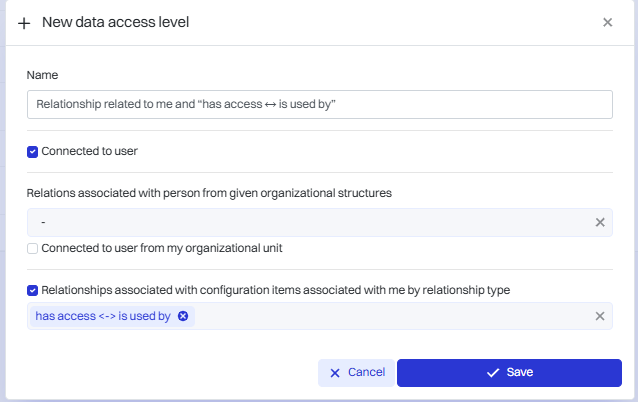
After granting such access, our selected user can see those that are related to him and related by relationship type.
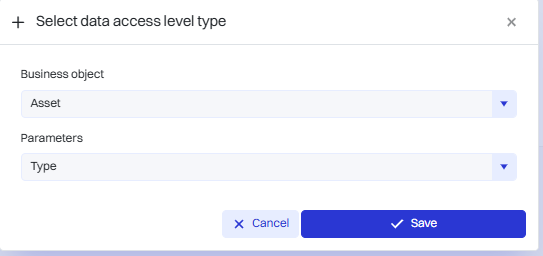
Asset
We select the business object “Asset” and parameters from the list. Then we click “Save”.
Description of parameters
|
1 |
Type - Types of resources that will be allowed. |
|
2 |
Organizational structure - The organizational structure that will be permitted. |
|
3 |
Location Structure - Location structures that will be permitted. |
|
4 |
Subordinate - Subordinates who will be permitted. |
|
5 |
User - Users who will be allowed. |
|
6 |
Organization - Organizations that will be permitted. |
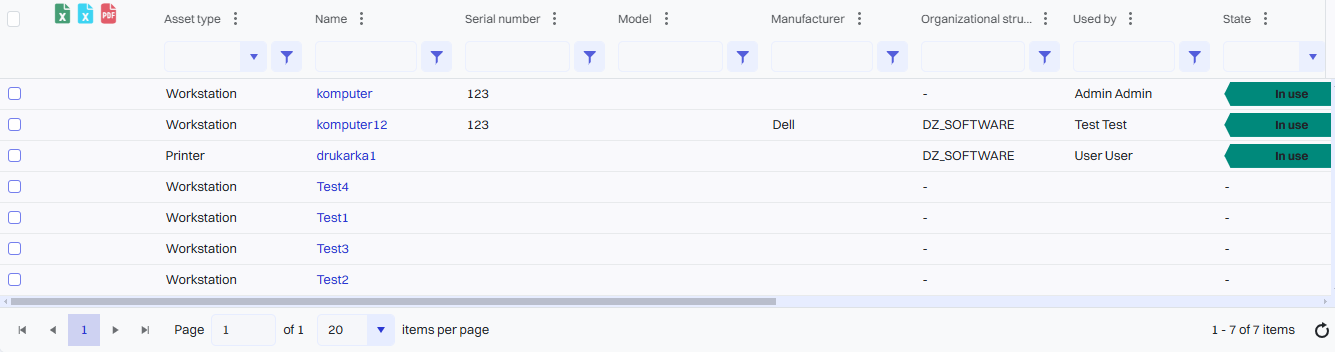
Example for Type
We fill in the fields we want. Allowed types of the resource, will be those types that the user will have access to.
After saving the changes, the user will only have access to workstation assets and printers.
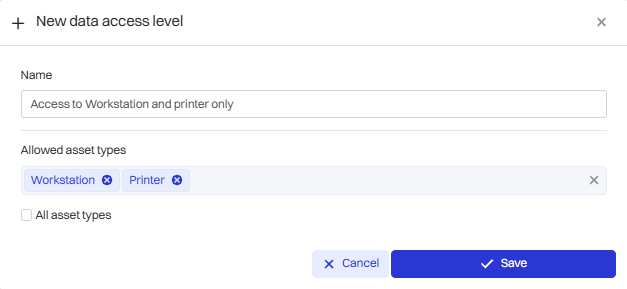
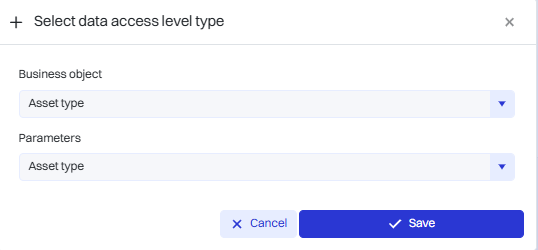
Asset type
Giving “Resource Type” access, we select the types that we want the user to access.
We select the “Asset type” business object and parameters from the “Asset type” list. Then we click “Save”.
Then we fill in the fields we want.
|
1 |
Name - the name of the data access level. |
|
2 |
Granted asset types - the types of asset that will be accessed. |
A user with such allowed types will only have access to them.
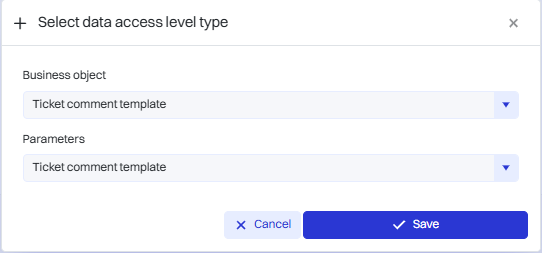
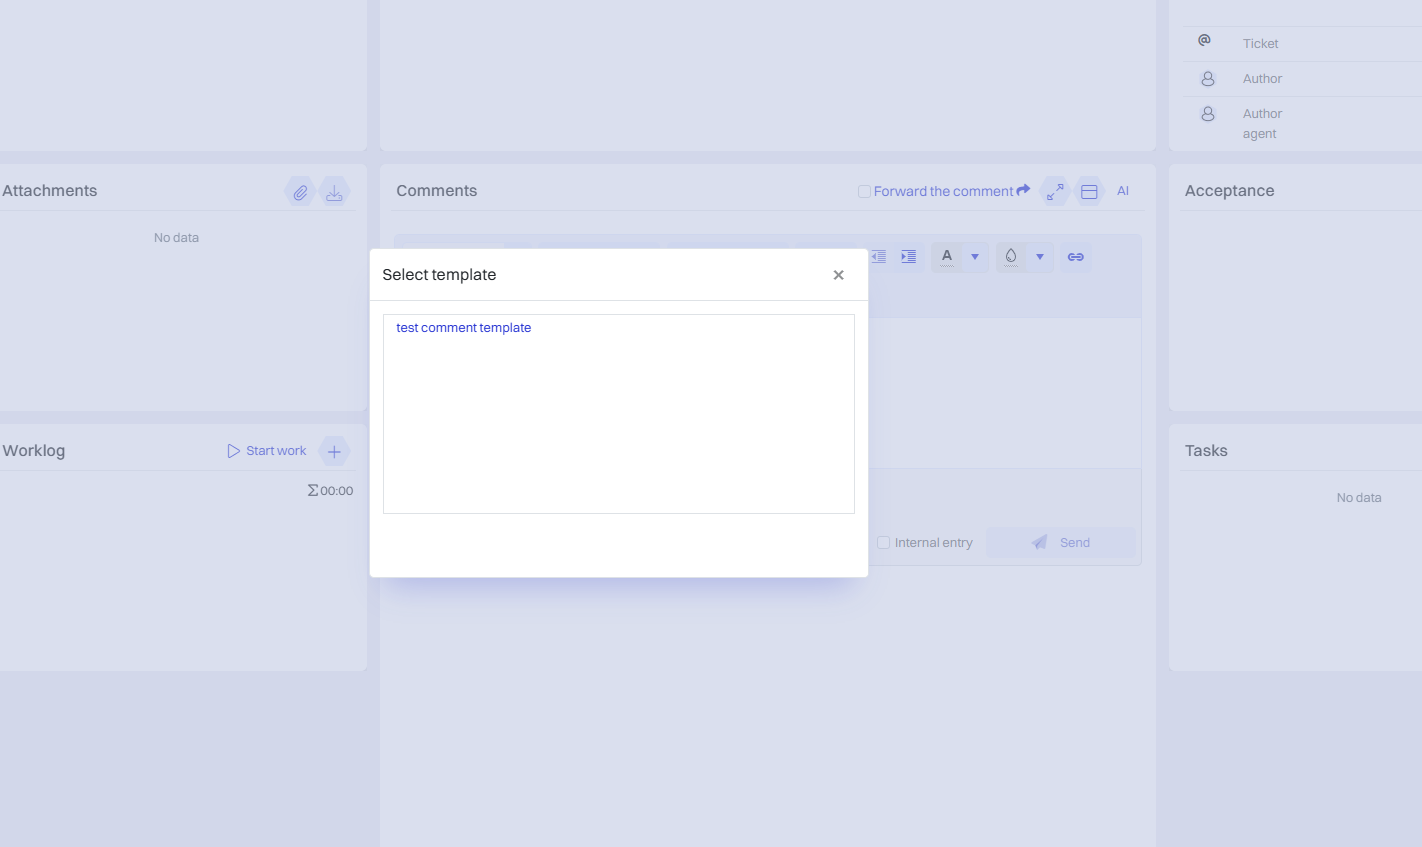
Ticket comment template
Create a comment template. Go >
We select the business object “Ticket comment template” and parameters from the list “Ticket comment template”. Then we click “Save”.
Then we fill in the fields we want.
|
1 |
Name - the name of the data access. |
|
2 |
Allowed templates - templates to which access will be granted. |
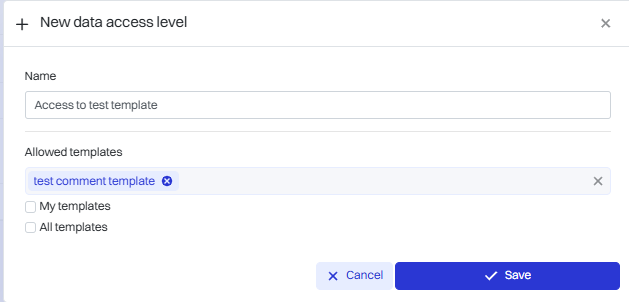
Once this access level is granted, the user will only have access to the selected template.
Document
We select the “Document” business object and parameters from the list. Then we click “Save”.
|
1 |
Related to a subordinate - Grant permissions to documents related to a subordinate. |
|
2 |
Type - Assign document permissions for a particular type. |
|
3 |
User - Assign rights to user documents. |
|
4 |
Department - Allowed documents from selected departments. |
|
5 |
Organizational structure - Allowed documents from selected organizational structures. |
Example for Type
We name the access level and add the types of document we want access to.
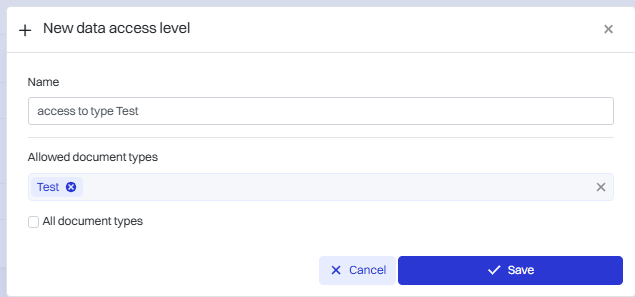
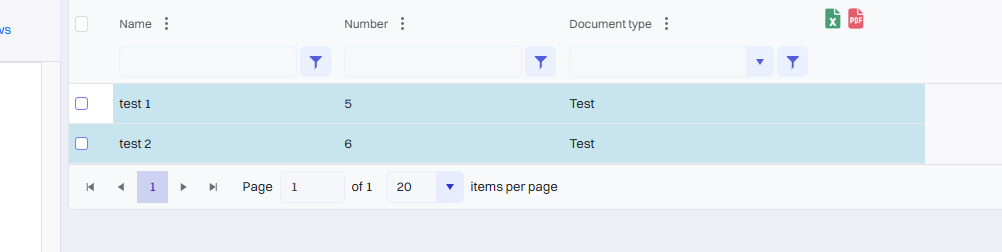
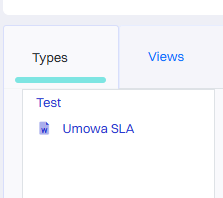
After granting such access, we see only those documents for the type “Test”
A user with such access only sees the selected documents, he does not see the list of types.
To grant access to types Go >
Document type
This level gives access to the list of document types
We select the business object “Document type” and parameters from the “Type” list. Then we click “Save”.
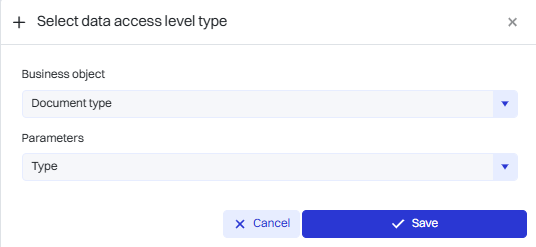
Then we fill in the desired fields by us.
|
1 |
Name - The name of the data access level. |
|
2 |
Granted document types - Types of documents to which access will be granted. |
In our case, we add access to the type “Test” and “SLA”
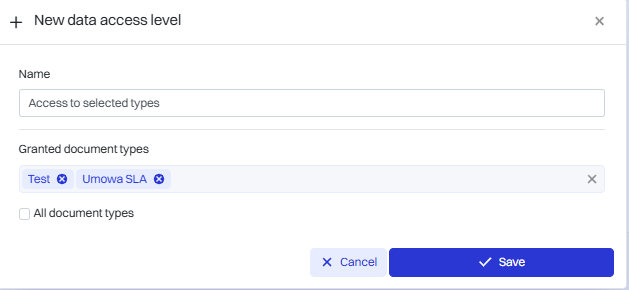
After adding this level of access, the user has access to a list of document types.
A user with such access only sees the list of types, not the documents themselves for the type.
To grant access to documents for the type Go >
Printout
We select the “Printout” business object and parameters from the “Printout” list. Then we click “Save”.
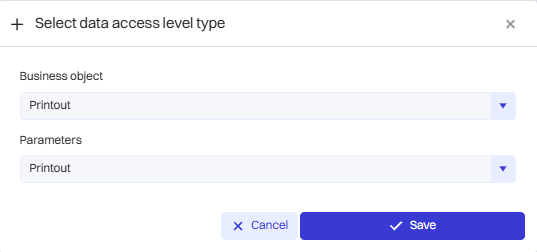
Then we fill in the desired fields by us. Then we click “Save.”
|
1 |
Name - the name of the data access level. |
|
2 |
Granted printouts - prints to which access will be granted. |
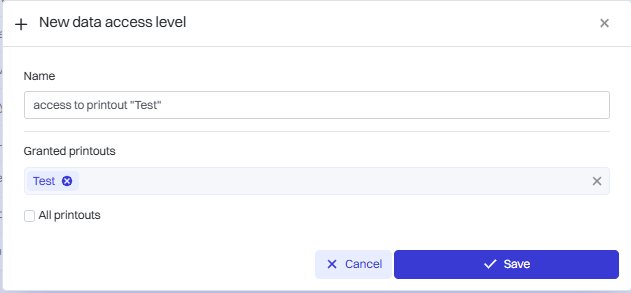
Once the changes are applied, the user will only have access to the selected printout.
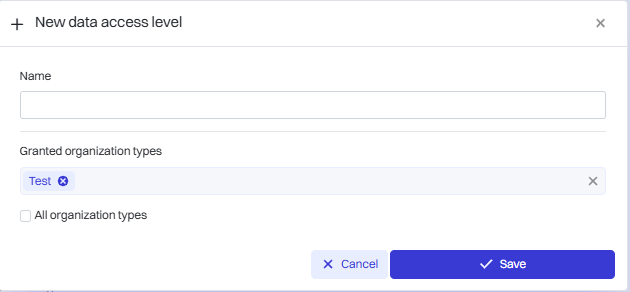
Organization type
After granting this access, the user will see a list of selected organization types.
We select the “Organization Type” business object and parameters from the “Type” list. Then we click “Save.”
Then we fill in the desired fields by us.
|
1 |
Name - the name of the data access level. |
|
2 |
Granted organization types - The types of organizations to which access will be granted. |
Document menu custom action
We select the business object “Document - custom menu action” and parameters from the list “Document - custom menu action”. Then we click “Save”.
Then we fill in the desired fields by us.
|
1 |
Name - the name of the data access level. |
|
2 |
Allowed menu actions - actions to which access will be granted. |
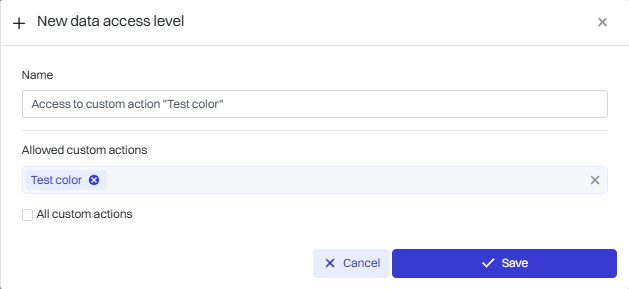
A person with such privileges will have access to the selected actions. When you go to Document Management > Documents, when you select the document you want and click “Rule actions” a list of actions (only those to which you have granted access) will be displayed.
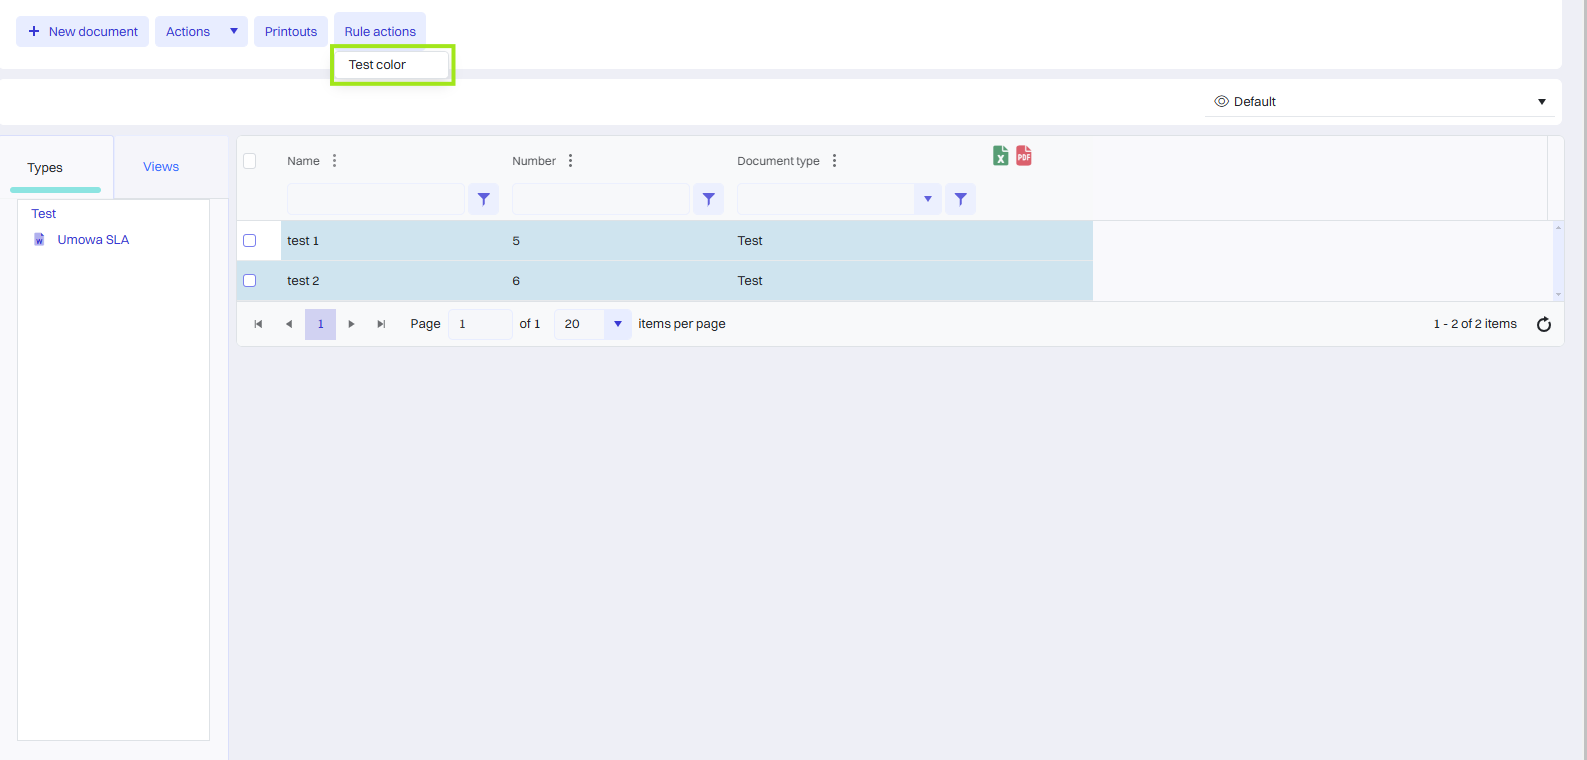
To create a rule Go >
Person
We select the “Person” business object and parameters from the list. Then we click “Save”.
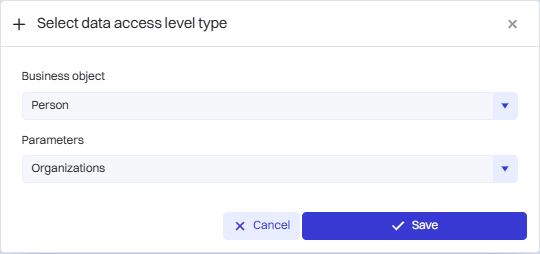
Organizations
The organization parameter is responsible for limiting visibility to selected organizations for the selected user. This user will have visibility to people from his/her and/or selected organizations.
We select the “Organization” parameter. Then after clicking “Save” we fill in the desired fields.
|
1 |
Name - the name of the data access level. |
|
2 |
Allowed organizations - people from organizations that will be visible when, for example, selecting from the list |
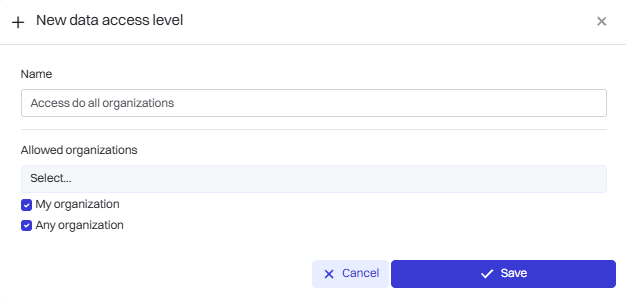
A person with this level of access will have access to the list of people from the selected organizations.
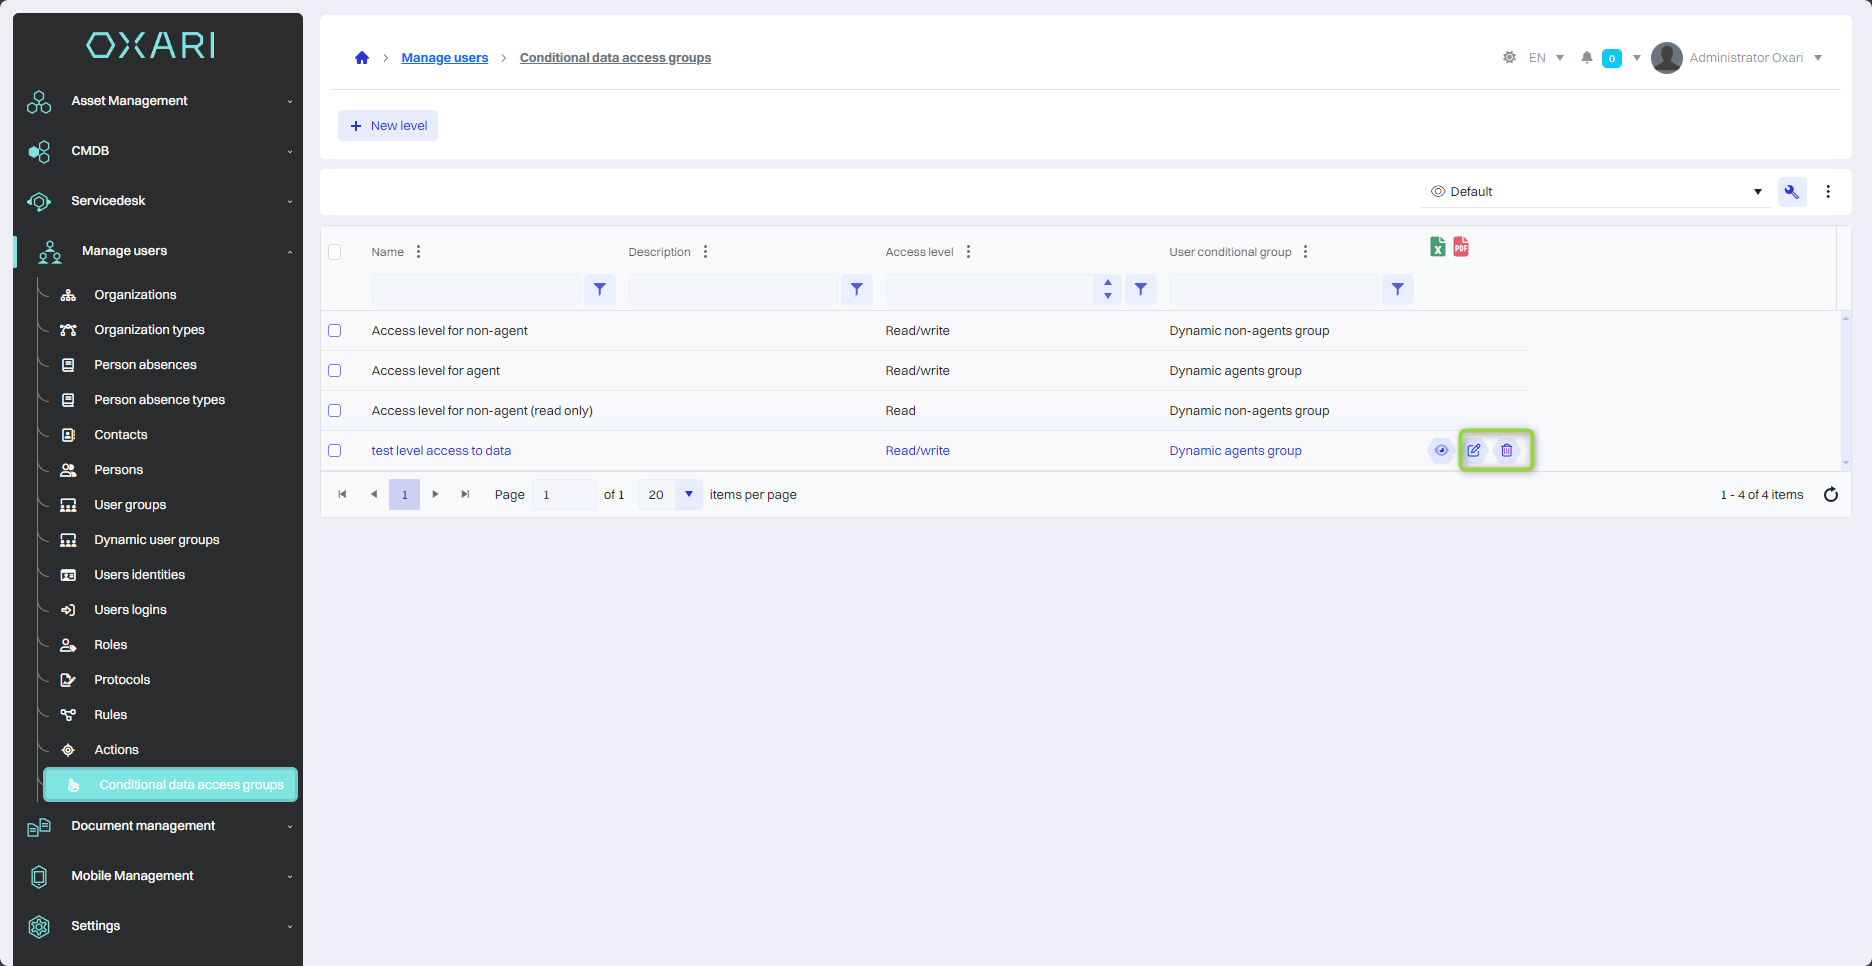
Editing/Removing an access level
To edit or delete an access level, go to User Management > Data Access Levels. Enter the detail view of the desired data access level. Hover over the desired access level. The edit/delete buttons will be displayed.
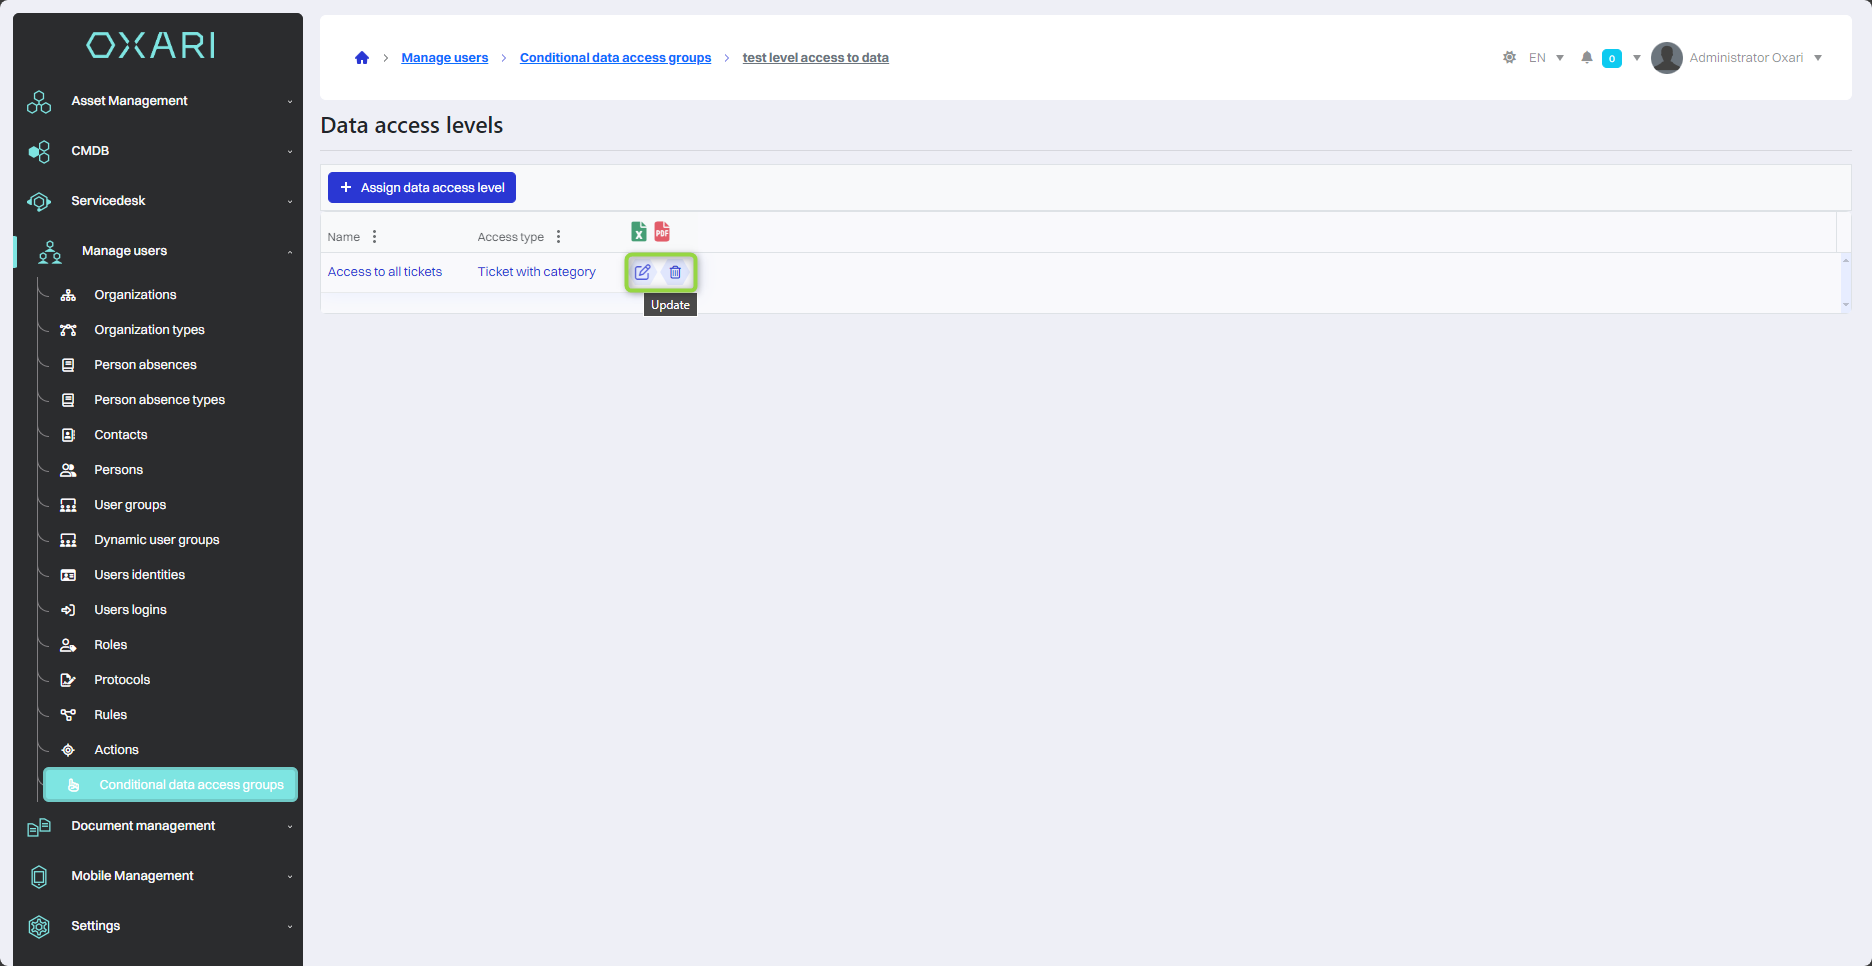
Editing/Deleting a data access level
To edit or delete an access level, go to User Management > Data Access Levels. Hover over the desired data access level. The edit/delete buttons will be displayed.